Staying High and Dry: Tips to Resealing RV Roof
Buying an old class-C RV that's still in good condition can save you real money. A thorough pre-purchase inspection is crucial. But buying an old used RV may need an overhauling especially the resealing the roof. So, let’s start with the process, its easy if followed correctly.
Step 1: What Sealant to Buy?
The RV industry is currently flooded with roof sealants. But don’t compromise on quality and always purchase a particularly designed product for RVs e.g., RV Roof Magic. Make sure which ever roof sealant you choose is compatible with your RV roof surface.
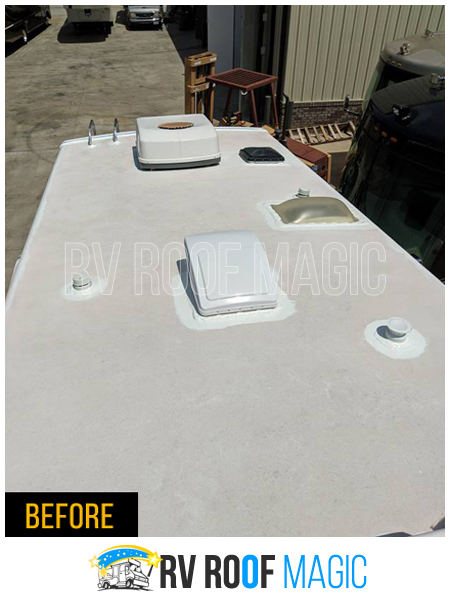
Step 2: Remove Previous Sealant
You have to start with prepping the surface area. This involves removing the old caulk, sealant and roof adhesives. You will not get the desired tight seal with old sealant or caulk in the way. For cleaning purpose use scrub pad and mild detergents and water wash the entire roof surface to get the rid of debris and any loose materials. Let the roof to dry completely.
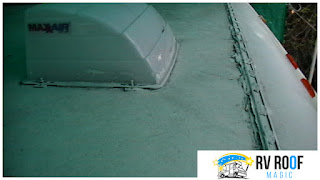
Step 3: Apply Seam Tape
This step looks easy but it is not. The biggest issue here is trying to lay down single continuous pieces of tape 10-15ft long covering the larger seams. Not all roof pieces are flat; some of the smaller details and pieces will be tedious to get the tape around so be persistent in your approach.
Step 4: Apply Caulk around Problem Areas
For sealing areas around AC vents and corners use a field tested and compatible product e.g., Rubex caulk. Rubex caulk is highly weather resistant and paintable caulk. It does not contain any solvents or isocyanates. It exhibits excellent adhesion to many substrates, including aluminum, brass, steel, glass, granite, marble, wood, and most plastics.
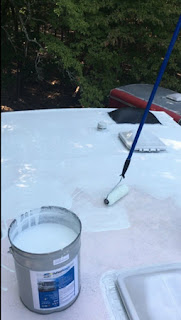
Step 5: Apply the Base Coat
Before you apply the base coat make sure 1) you have enough to do the full coat and 2) it’s not going to rain at least for few hours, ideally for 24 hours. Also don’t walk on the roof after doing the base coat. To achieve an even coat with more area coverage you rollers and for hard to reach areas use paint brushes.
Step 6: Apply the Top Coat
Once the base coat is dry, apply the top coat. There is nothing much to focus in this step besides making sure to apply enough and give it enough time in between coatings to dry. With few days of un-interrupted sun in the row the coating will fully cure resulting in a smooth fine finish.
Step 7: Sit Back and Relax
The job is done, sit back and relax. Half vehicle, half home the bipolar attributes of RV pose unique maintenance challenges. Out of all the materials and elements the RV roof takes the toughest toll while on the road towards camping. That’s why it is very important to understand how to effectively reseal RV roof and keep it in a tip-top shape.
If you’re planning on doing a roof resealing job and wondering about material costs visit, https://www.rvroofmagic.com/calculator.php for detailed reading regarding RV Roof care and maintenance visit, https://www.rvroofmagic.com/care-and-maintenance.php

Step 1: What Sealant to Buy?
The RV industry is currently flooded with roof sealants. But don’t compromise on quality and always purchase a particularly designed product for RVs e.g., RV Roof Magic. Make sure which ever roof sealant you choose is compatible with your RV roof surface.
Step 2: Remove Previous Sealant
You have to start with prepping the surface area. This involves removing the old caulk, sealant and roof adhesives. You will not get the desired tight seal with old sealant or caulk in the way. For cleaning purpose use scrub pad and mild detergents and water wash the entire roof surface to get the rid of debris and any loose materials. Let the roof to dry completely.
Step 3: Apply Seam Tape
This step looks easy but it is not. The biggest issue here is trying to lay down single continuous pieces of tape 10-15ft long covering the larger seams. Not all roof pieces are flat; some of the smaller details and pieces will be tedious to get the tape around so be persistent in your approach.
Step 4: Apply Caulk around Problem Areas
For sealing areas around AC vents and corners use a field tested and compatible product e.g., Rubex caulk. Rubex caulk is highly weather resistant and paintable caulk. It does not contain any solvents or isocyanates. It exhibits excellent adhesion to many substrates, including aluminum, brass, steel, glass, granite, marble, wood, and most plastics.
Step 5: Apply the Base Coat
Before you apply the base coat make sure 1) you have enough to do the full coat and 2) it’s not going to rain at least for few hours, ideally for 24 hours. Also don’t walk on the roof after doing the base coat. To achieve an even coat with more area coverage you rollers and for hard to reach areas use paint brushes.
Step 6: Apply the Top Coat
Once the base coat is dry, apply the top coat. There is nothing much to focus in this step besides making sure to apply enough and give it enough time in between coatings to dry. With few days of un-interrupted sun in the row the coating will fully cure resulting in a smooth fine finish.
Step 7: Sit Back and Relax
The job is done, sit back and relax. Half vehicle, half home the bipolar attributes of RV pose unique maintenance challenges. Out of all the materials and elements the RV roof takes the toughest toll while on the road towards camping. That’s why it is very important to understand how to effectively reseal RV roof and keep it in a tip-top shape.
If you’re planning on doing a roof resealing job and wondering about material costs visit, https://www.rvroofmagic.com/calculator.php for detailed reading regarding RV Roof care and maintenance visit, https://www.rvroofmagic.com/care-and-maintenance.php

Thank you so much for such an informative piece of information :)
ReplyDeleteIf anyone interested similar one's have a look here
rvguiders
Thanks